As a new player do you want to make millions of ISK risk free and have fun learning the map doing it? Want advice from a new player on how to get there your first day?
My goal in this thread is to talk a little about my experience as a new pilot, and how you can pop million isk sites with 32,000 isk of probes and a piece of junk tutorial scan-ship. I promise you, the thread may seem long, but it’s not overwhelming, and you CAN figure this out in a day.
First, about me: I haven’t played EVE since 2008, so I’m a newbie like you! (Assuming that’s why you’re in the New Citizens’ Board).
I wasn’t sure what I would “fall in love with” in getting back to EVE, I just knew I wanted to get back into the game. So my first piece of advice is there’s a lot of great tutorials out there, but this is the best one (let me see if I can link it here.) Alpha to Omega Wormhole Tutorial
Now don’t worry, you won’t be exploring Wormholes, unless you want to, I found that while I could crack the sites there (capsuleers call it popping sites, but I think of it like cracking a safe), all the sites were hostile. And it’s not a good use of time to find hostile sites when you’re flying in an unarmed T1 scanner.
Why is that video so good? I watched HOURS of videos, what’s great about that one is it’s everything you need to know. How to generally avoid gate camps, how to avoid being scanned and found while you’re working in a hostile system. So, on to my bit of advice!
- Follow the advice in that YouTube video, and practice it in HIGH SEC all the time. Always leave a gate, get fast at warping to a celestial object, ctrl-B and set down a “Safe bookmark”, set down a couple, then always shuffle between those bookmarks during your exploration in that system. Do always, like a firefighter, or a submariner, you never know when you’ll slip into low sec and let your guard down.
- Don’t worry about it too much because your scan-ship can literally be the one given to you by the tutorial. - Just learn how to fit your ship to the standard scan-ship kit.
K - into the meat and potatoes. Things to understand about scanning. What actually is scanning? Without getting into too much detail, and just sort of feeling it out myself, scanning seems to be like a lock-picking minigame where you have to find the right combination to narrow in on the “solution”.
Pro-Tip: 100% of all tutorials I found only “bruteforce” the lock. I see that advanced players talk about what’s to follow, but I have found no tutorials on it or why it’s a thing. Basically if my scan probes, ship bonuses, level bonuses, are overpowered, I can scan anything low level without any effort. This is NOT a thread about buying sister probes and bruteforcing the “lock”.
Why do I associate it with that? Because I have demonstrated to myself that different PARTS of the scan require different tactics, that brings us to the next part everyone should figure out.
Your probes can be customized using shift, alt, or cntrl, and that this affects the scan.
There are default formations, so what are those first?:
- Pinpoint: this one scan can get you pretty close, but as you get to Level III and above, I rarely find it powerful enough to get passed 10%, these Level IIIs are great for you to change your custom configurations to practice how to push your scan power much much higher than default.
- Spread formation: it spreads the probes out just to find things in general. It seems either a deprecated feature or not useful to this stage.
Changing the shape of pinpoint is where your bread and butter will be, my customs fit into three categories so far, each has a purpose tailor made to working on the percentages of the site. Because these are shapes, notice the difference of the shapes, I’ll eventually post some pics on what positions to move the probes for each custom formation.
- Triangulation: this is my optimized version of the pinpoint scan. See screenshots:
Figure 1a: Properly fitted pinpoint scan for comparison. This shows how “loose” and therefore weak the signal strength is in pinpoint configuration.

Figure 1b: A 16.9% anomaly about to pop in one scan, notice the near perfect circle the scan forms, notice the shape is no longer a five petal flower but something closer to a Celtic Trinity. This scan is also flat, I’ll get to that in a second.
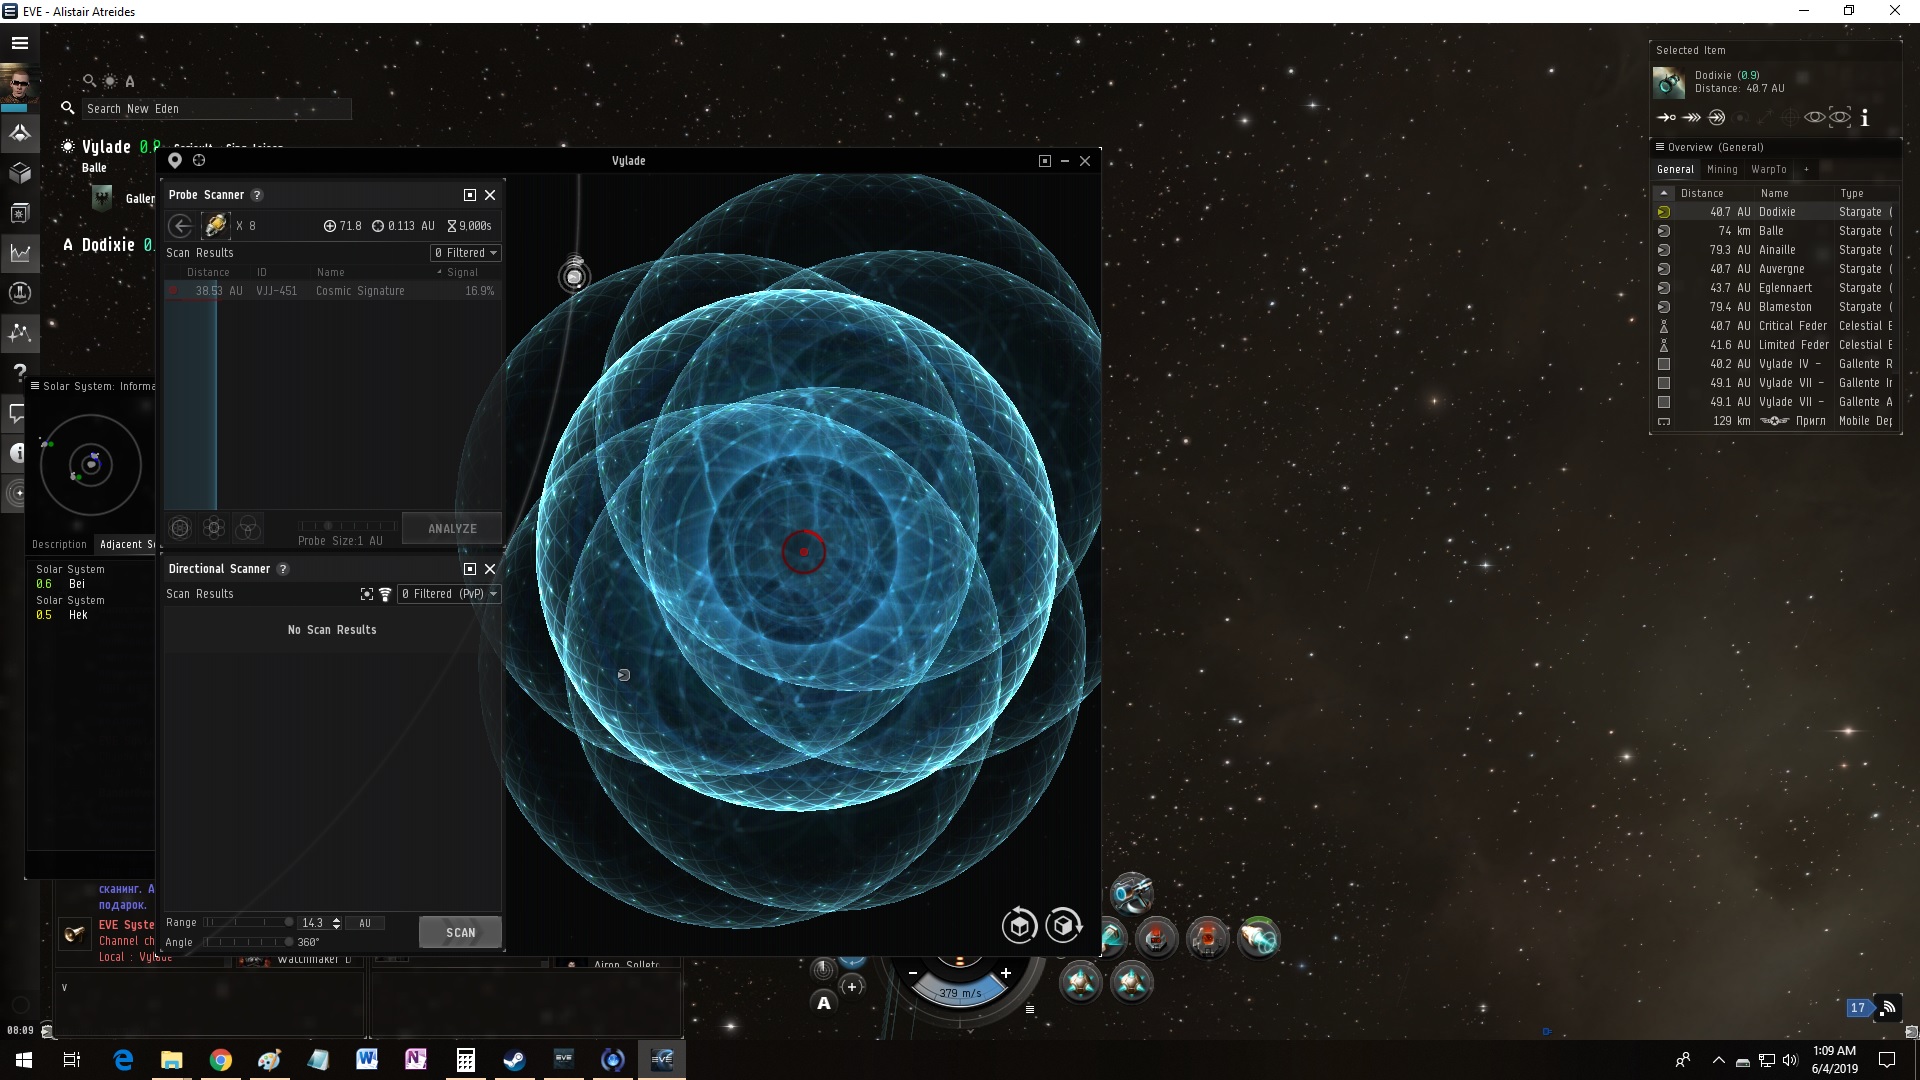
Figure 1c: The end result, a wormhole, not particularly hard to scan, but these are probe I’s and you’ll find that popping a wormhole with regular pinpoint does take more steps at such a weak scanning power unless you customize.

- Flatter scans: these scans are designed to scan on a plane, usually the plane of the ecliptic. Occassionaly you will bump into a site that won’t go below a certain value, I’ve found this happens around 10-20%. If in that range you will want to try a flat scan. It looks like this:
Figure2a: Here we see the flattened scan shape, notice I’ve moved my probes to a horizontal plane instead of the two being above and below center, and I’ve stretched out the probes so that their fields overlap such to create that elongated discus shape in the center. This shape can be used to “fit” the red circles you sometimes pop-up. But despite if you see a red circle or not, using this shape around 10%-20% will have generally good results during the condition when using Triangulation (pinpoint) around that percentage causes you to LOSE the site (get weaker %). That condition (it’s a deviation wall) is why you can’t get passed the 10% often at higher levels with Probe I’s and default formations.

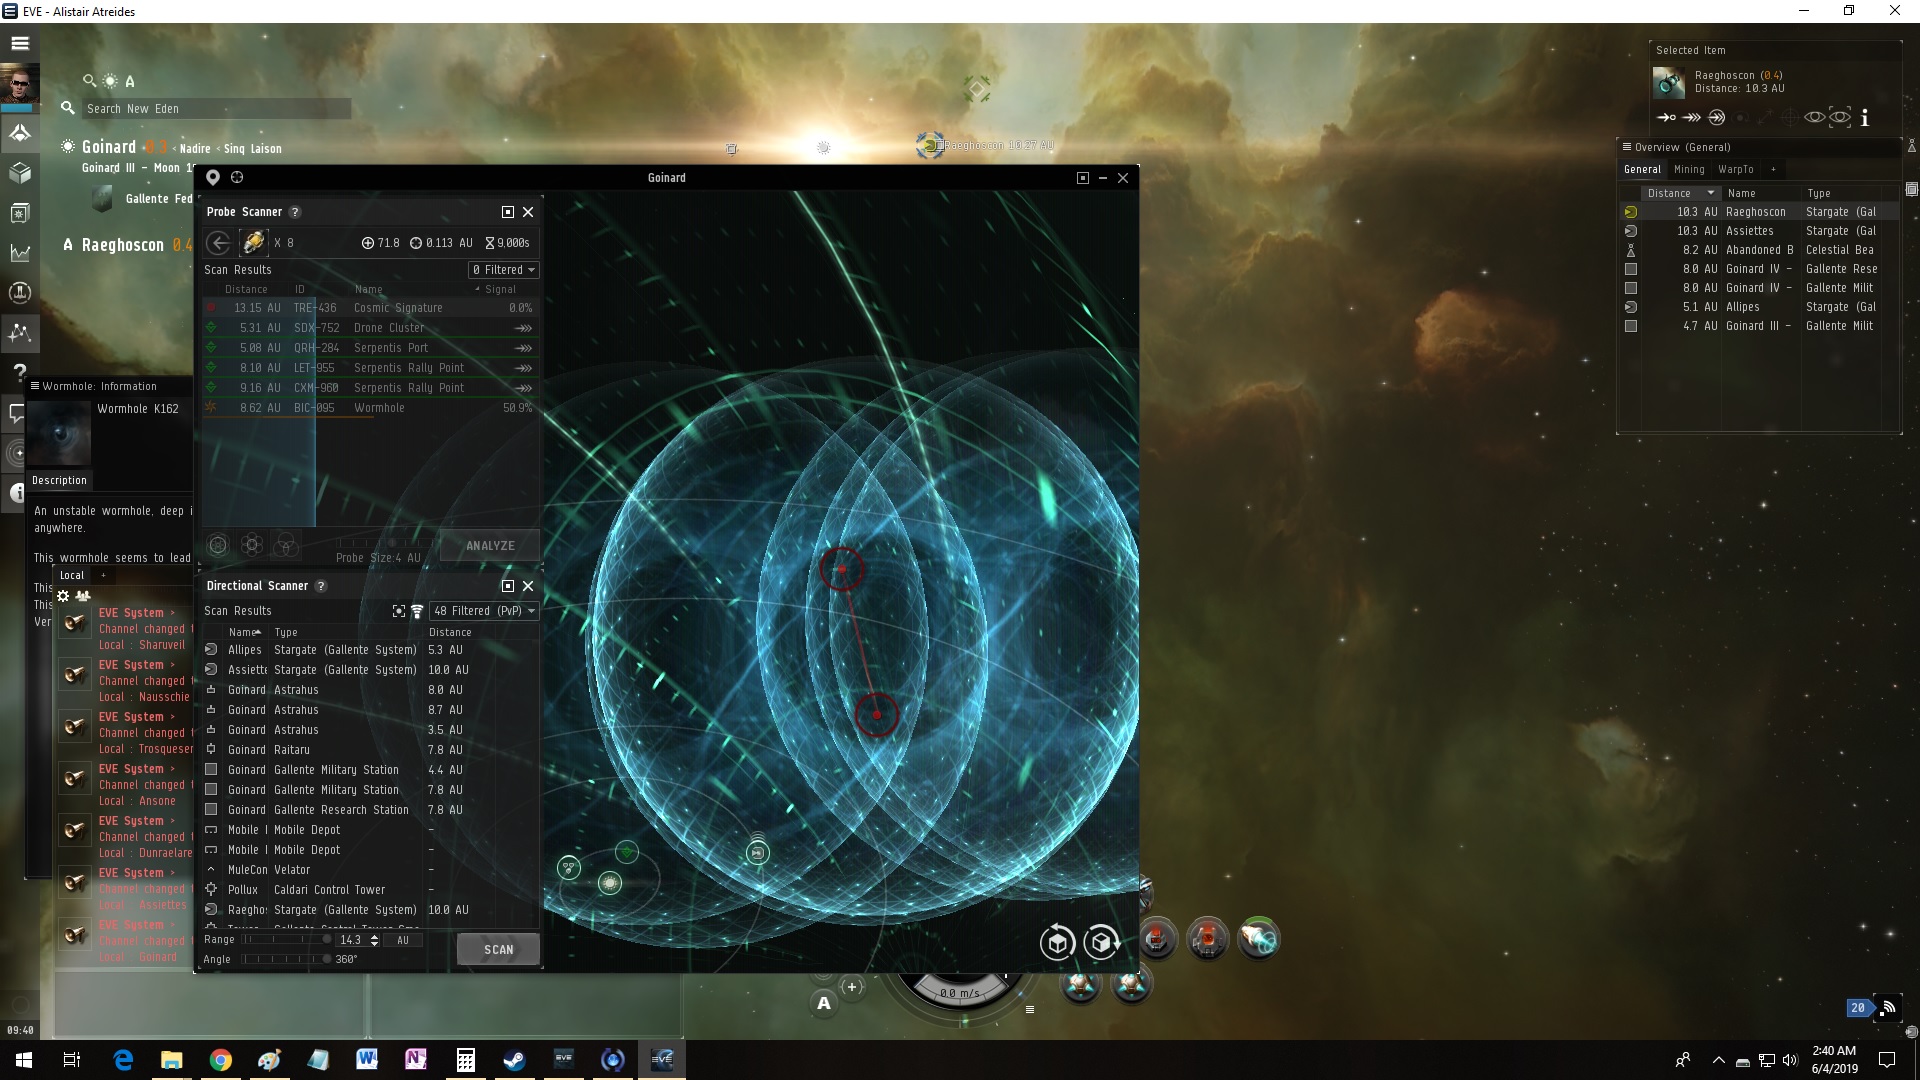
- Line-Scans: this scan is designed to target lines you occasionally see, now whether you see a line or not, I found instances where I could NOT get my site passed any meaningful percentage, WITHOUT this shape. This shape is like the flattened shapes, except also the probes are moved into a line. In instances like in the figure where I’m trying to scan a 0%er that I kept LOSING with my other scans, I did eventually pop that site. The line is orientated perpendicular to the line you’re targeting which can require some interesting geometry. As with the circle, the site may not have a line, but still require this shape to reach the next percentage lock.
Figure 3a: Here the 0% was eventually popped, this line scan was the “first crack”. After a moment I was able to get the percentage high enough to use triangulation.
K now that you’ve seen some basic “shapes”, I do promise I’ll show the actual formation configuration at some point.
Moving passed that, let’s put it all together so you can pop Level III+ sites in 15 minutes using Probe I’s.
Tactics.
- First: run a pinpoint scan on the target, getting the box as tight to the point, and the scan as well fitted to the red sphere as possible. If you don’t have the sphere, it probably means the target is ready for 16AU.
- Second: if you got a percentage out of that, any percentage, move to Triangulation scan at 8AU
2a. If that did NOT increase the percentage, try the Flattened scan. Only rarely will you need to do a Line scan.
2b. I have THREE degrees of flattened scans, and YES they do matter. but they won’t matter enough to new pilots to distinguish them here. Just know, flat = all in a plane. And the degree of flatness is how close to the plane all your probes are.
Pro-Tip: Why this matters? Because many sites are close to the ecliptic and so a flatter scan will deliver more power to where the site most-like will be.
- So far, I’ve been able to increase the percentage of any site in wormhole space using 1 through 2. The basics here is you need to fiddle with AU sometimes to increase the %.
- Once you get to about 10% you can generally stick to Triangulation. If your 8AU increased the %, you can go to 4 AU, if the 4AU increased the % you can generally go to 1AU, and if that worked you can generally go to .25AU.
So let’s put it all together.
Conclusion:
As a new pilot, the game is overwhelming, but exploration is an easy way to get into it and get isk for buying more things. You now have an idea of what scanning entails.
Scans use shapes, to shape the power of the scan against a target (the center of the scan).
The only shapes you are given are “pinpoint” and “sweep”, and sweep is near useless to you. And pinpoint is NOT optimized. Pinpoint might allow you to get a wormhole in 4-5 ping sweeps, but you can literally pop a wormhole in 2 sweeps with Probe I’s if you just optimize your pinpoint to a “Triangulator”.
Customizing shapes does MORE than just increase the power delivered to the scan target. It helps reduce deviation. Behind the scenes this is what’s happening when you get “lines” and “circles”. Those show that you had a deviation in your scan. On low levels, or at high powers and lower deviations, you can bruteforce them, which is what most people do.
Most people just bruteforce scan the line or circle, get a new position, and work forward.
But with probe I’s fresh out of dock on Level IIIs and above, you’re generally going to fail those and not be able to pop the site.
So customizing shapes is an essential skill that takes an hour or so to get decent with, playing with alt, shift, and ctrl keys while scanning.
You’ve also been introduced to how to keep yourself safe WHILE scanning. Do it, practice it all the time in HIGH SEC so you do it effortlessly.
Lastly, just get fast, don’t worry about finessing anything until you’re at the highest zoom. Wasting 5 minutes to narrow into something you can’t perfect until the end anyway is well, a waste of time.
Extra Credit: Advanced concept for the avid learner!
Scanning shapes are not always centered on your cube. That means you can improve your alignment of your custom formations, but that’s irrelevant. Where the shapes overlap represent an increase in power and the shape represents decrease of deviation (so the narrower/better fitted shapes are less deviated).
That means regardless of where your shapes are centered, you center the target where the shape fits the best and has the more overlap.
This allows you to get creative with oblique-to-ecliptic directions. I was going to build one for the line scan, but haven’t truly needed a “tilted” axis yet.
Happy hunting!